Maximize Your Productivity with ASTER Pro Software: A Step-by-Step User Guide
How ASTER Pro works
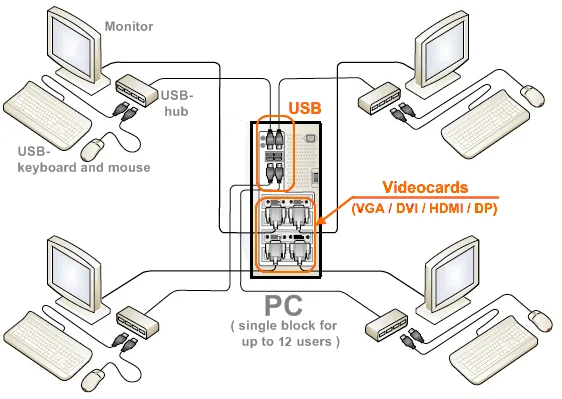
ASTER Pro is a software that enables you to turn a single computer into a multi-user workstation. It creates multiple virtual workstations on a single computer, allowing multiple users to work on separate screens simultaneously. Each user has their own keyboard, mouse, and monitor, and can access their own desktop, applications, and files.
Benefits of using ASTER Pro for productivity
Using ASTER Pro can help you maximize your productivity in several ways. First, it eliminates the need for multiple computers, saving you hardware costs and reducing clutter. Second, it allows multiple users to work on the same computer at the same time, which means you can collaborate more easily and efficiently. Third, it can increase your productivity by up to 200%, as each user can work on their own tasks without interrupting others.
System requirements for ASTER Pro
Before installing ASTER Pro, make sure your computer meets the following requirements:
- Windows 7, 8, 8.1, or 10 (32-bit or 64-bit)
- Dual-core processor or higher
- 4 GB of RAM or more
- One or more graphics cards with at least 1 GB of VRAM
- One or more USB ports for connecting keyboards, mice, and other peripherals
Setting up ASTER Pro on your computer
To set up ASTER Pro on your computer, follow these steps:
- Download the ASTER Pro software from the official website.
- Run the installer and follow the on-screen instructions to install the software.
- Once the installation is complete, restart your computer.
- Connect additional keyboards, mice, and monitors to your computer.
- Launch ASTER Control Panel from the Start menu.
- Configure your workstations by assigning separate USB ports, video outputs, and audio outputs to each user.
Configuring ASTER Pro for multiple workstations
To configure ASTER Pro for multiple workstations, follow these steps:
- Launch ASTER Control Panel from the Start menu.
- Click on the “Workstations” tab.
- Click on the “Add” button to add a new workstation.
- Assign separate USB ports, video outputs, and audio outputs to each workstation.
- Repeat steps 3-4 for each additional workstation.
Customizing ASTER Pro settings for individual users
To customize ASTER Pro settings for individual users, follow these steps:
- Launch ASTER Control Panel from the Start menu.
- Click on the “Users” tab.
- Select the user you want to customize settings for.
- Click on the “Edit” button.
- Configure the user’s settings, such as desktop wallpaper, sound volume, and keyboard layout.
- Repeat steps 3-5 for each additional user.
Tips for maximizing productivity with ASTER Pro
To maximize your productivity with ASTER Pro, consider the following tips:
- Use multiple monitors to increase your screen real estate.
- Assign separate USB ports to each user to avoid conflicts.
- Install a virtualization software to run multiple operating systems on the same computer.
- Use a high-performance graphics card to ensure smooth performance.
- Keep your computer clean and organized to minimize distractions.
Troubleshooting common issues with ASTER Pro
If you encounter any issues with ASTER Pro, try the following troubleshooting steps:
- Ensure that your computer meets the system requirements for ASTER Pro.
- Update your graphics card drivers to the latest version.
- Restart your computer and try again.
- Check the ASTER Pro user manual for additional troubleshooting tips.
Conclusion and final thoughts on ASTER Pro
ASTER Pro is a powerful tool for maximizing your productivity by turning a single computer into a multi-user workstation. By following our step-by-step user guide, you can set up and configure ASTER Pro to meet your specific needs and streamline your work processes. With its ability to increase productivity by up to 200%, ASTER Pro is a must-have tool for freelancers, small businesses, and large corporations alike.